| Chapter 2: Scripter Instruction Manual |
| Extended Reference & Further Readings |
by Robert T. Arrigo
The Mind Project, Illinois State University
Overview
After reading Chapter 1: The Servo Controller and Chapter 2: The Scripter, from the Iris.4 Mobile Robot Manual, use this guide to learn how to operate the Scripter in each of its four modes.
Running the Scripter
To run the Scripter, go to the Computer Desk and click the Scripter program icon on the computer screen.
Selecting a Scripter Mode
To select a Scripter mode, click the Select a Task menu and choose the mode you would like to use.
Sections:
Create/Edit Wheel Motion - Instructions
Screenshot: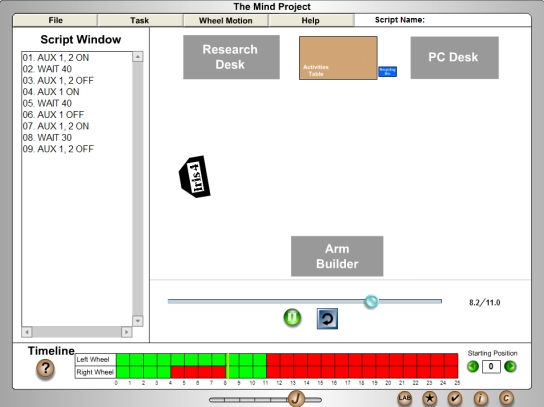
General Info
Using the Scripter's Create/Edit Wheel Motion mode, you can create and edit wheel motion scripts that are used to drive Iris around the lab. Scripts are created by turning the left and right wheel motors on or off with the interactive Timeline at the bottom of the screen. The script code is produced automatically and written to the Script Window on the left side of the screen. This window is read only - to alter a script, you simply click the timeline to turn a wheel on or off for a particular second. You can preview your script using the mini preview window in the middle of the screen. The green arrow plays the script, the blueish circular arrow rewinds the script.
Menu Options
Scripts are loaded and saved just like Windows programs - simply select the File menu, and choose an option (New Script, Load Script, Save Script, Save Script As, Exit). Note: Selecting New Script will erase your current script, unless you've already saved it.
The Select a Task menu let's you switch between the Scripter's various modes.
The Wheel Motion menu's Reset Wheel Movement option lets you erase all of the wheel motion from your script.
The Help menu allows you to access this document, a quick reference guide, and a Chapter 2: The Scripter from the Iris.4 Mobile Robot Manual.
Timeline
The Timeline shows 25 seconds worth of wheel motion at a time. There is one row of blocks for the left wheel, and a second row of blocks for the right wheel. At any given second, each motor is turned on or off individually according to the color of the block in the motor's row. If the block is red, the wheel is off; if the block is green, the wheel is on. To control the wheel motion in tenth-of-a-second intervals, follow these instructions:
Hold down the control key on your keyboard (Ctrl) and click on any 1 second interval on the timeline.
You can now turn the wheel motors on or off during that 1 second interval in tenth-of-a-second increments.
To return to 1 second intervals, control click the zoomed-in interval's box again.
Writing a Simple Wheel Motion Script
Suppose you wanted to write a wheel motion script that would:
- Move Iris Forward
- Make Iris Turn Clockwise
- Move Iris Forward Some More
- Make Iris Turn Counter-Clockwise
- Move Iris Forward Some More
To begin, create a new, blank script by selecting the New Script option from the File menu.
Iris will drive forward when both drive motors are running at once. Turn the first two boxes of the Left Wheel row green by clicking on them; do the same for the Right Wheel.
Iris will turn clockwise when the left wheel is running and the right wheel is off. Turn on the left wheel for one second by clicking the third box in the Left Wheel row. Leave the right wheel off (its third box should remain red).
Move Iris forward again by turning the left and right wheels on at once. Click the fourth box of both the left and right wheel rows so that they are both green.
Iris will turn counter-clockwise when the right wheel is running and the left wheel is off. Turn on the right wheel for one second by clicking the fifth box in the Right Wheel row. Leave the left wheel off (its fifth box should remain red).
Move Iris forward one last time by turning the left and right wheels on at once. Click the sixth box of both the left and right wheel rows so that they are both green.
Your Timeline should look like this:

Preview your script by clicking the green arrow button in the preview window.
Create/Edit Arm Behavior - Instructions
Arm Behaviors
Arm behaviors are reusable arm scripts that can be inserted into wheel motion scripts to create unified scripts of wheel motion and arm movement. Once an arm behavior has been created and saved, it can be inserted multiple times into the same or different wheel motion scripts. Further, multiple arm behaviors can be inserted into the same wheel motion script, thus arm behavior scripts are quite useful.
Help
When using the Arm Behavior Editor, you can get help from this document (accesible from the Scripter's Help menu), or you can consult a Quick Reference guide by clicking the ? icon near the Timeline, or selecting Quick Reference from the Help menu. You may also want to review Chapter 2: Scripter from the Iris.4 Mobile Robot Manual.
Interface/Layout
To create arm behaviors, run the Scripter and choose the Create/Edit Arm Behaviors option from the Select a Task menu. Upon entering this mode, you should select an arm to work with. To do so, select Load Arm from the Arm Behavior menu. Once an arm is loaded, your screen will look similar to this:
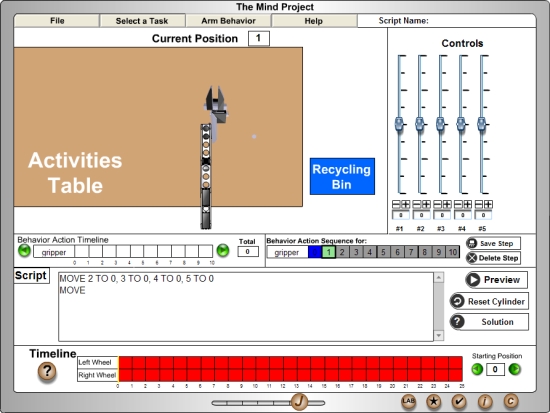
In the upper-left quadrant of the screen is a top-down view of the arm as it would appear when Iris is positioned in front of the Activities Table. This window is used for previewing the arm behavior. To the right of the preview window are servo controls for the arm you are working with. Each slider controls an individual servo. Move the slider up the screen rotates the servo clockwise; moving the slider down the screen rotates the servo counter-clockwise. The numerical position (-1400 to +1400) can be edited directly using the boxes below the sliders. The + and - buttons can be used to make small corrections to the servo's position.
At the very bottom of the screen is the Timeline of the currently loaded script - it will show both wheel motion and any arm behaviors that have been inserted into the script. Above the Timeline is a read-only text version of the arm behavior script; it is generated on your behalf as you use the slides to generate an arm behavior. To the right of the script window are three buttons. The Preview button will play your arm behavior in the preview window. The Reset Cylinder button will reset the grey cylinder to its original position on the table. The Solution button contains step-by-step instructions for creating a behavior that will place the grey cylinder in the recycling bin.
Above the script window are the Behavior Action Timeline that shows the time duration of the arm behavior you are developing. To its right is the Behavior Action Sequence and the Save Step and Delete Step buttons.
Using the Arm Behavior Editor
An arm behavior consists of a sequence of action steps. Each step specifies a position for the arm by indicating which servos need to be rotated to get the arm into that position. When the behavior script is executed, the Scripter will read each step of the arm behavior and tell the servos how to rotate to move into position - this is how arm motion is generated.
To begin writing an arm behavior, use the servo controls to move the arm into a new position. Click the Save Step button. Again, use the controls to move the arm in another new position and then click Save Step. Your screen will look something like this:
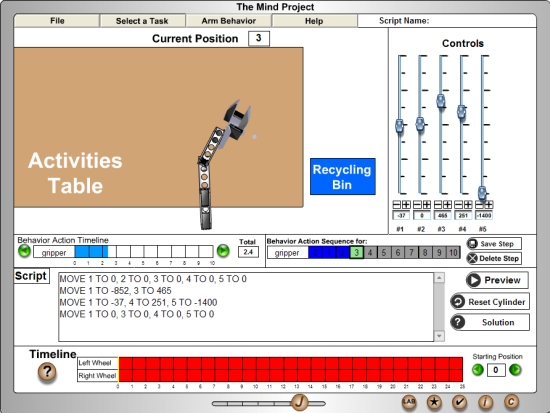
Please Note: Every behavior must start and stop in the neutral position; these steps are automatically inserted into your behavior. That is why a two step behavior actually has four MOVE commands. (A twelve step behavior would have 14 MOVE commands, and so on). You cannot delete these "zero-out" steps.
To watch your arm behavior, click the Preview button. You can go back and edit a step by clicking on the step in the Behavior Action Sequence, adjusting the servo controls, and clicking the Save Step button. Steps can be deleted by by clicking on a step in the Behavior Action Sequence and clicking the Delete Step button.
Saving & Loading Arm Behaviors
You can save, load, or create a behavior, or delete an existing behavior, by selecting the appropriate option in the Arm Behavior menu. If you are logged in to the lab, these behaviors will be stored for you across sessions so that you can access them when you re-login to the lab.
Combine Arms & Wheels - Instructions
Combine Arms & Wheels mode allows you to integrate arm behaviors into wheel motion scripts. Just load up a wheel motion script (File->Open Script), then drag the arm behaviors onto the timeline at the time when you want them to run. Arm behaviors can be reused within the same script, and different arm behaviors can be added to the same script.
Once a behavior is added to the timeline, the script window will show the contents of the updated script file. If you don't want to overwrite the wheel motion script with the new "combo" script, use the File->Save As option and type in a new name for the script.
Note: Arm behaviors cannot overlap, and arm behaviors cannot be added to the timeline when either of the drive motors are on.
Re-Printed from the Quick Reference Message:
In the Combine Arms & Wheels mode, arm behaviors can be added to wheel motion scripts to create a unified script that includes both wheel motion and arm movements. To add an arm behavior to the script, first identify where on the timeline you want the behavior to start. If necessary, use the scroll buttons to move the timeline to the desired position.
When you've identified where you want the arm behavior to run, drag the icon of the arm behavior from the list of behaviors (listed under the name of the arm the behavior was written for) to the timeline. When the behavior icon is near the timeline, a number will pop up that displays, to the tenth-of-a-second, when the arm behavior will start. When the behavior is where you want it, release the mouse button the behavior will snap into the timeline.
To remove a behavior, just drag it off of the timeline.
Note: the arm behavior can only run while the wheel motors are off!
For complete instructions on using the Scripter's Combine Arms & Wheels mode, please select the Instruction Manual option from the Help menu.